Flora Joy’s Fabric Arts Showcase
The site below has been created solely to share the FUN Flora has been having with the fabric arts as a personal hobby (and to PROVE to some of her friends that she COULD retire from the academics--or at least not not remain "at work" full time). If you have any questions about any of these projects (or suggestions for FUTURE projects), feel free to contact her at: florajoy@comcast.net
Flora's latest book on fabric arts:
For Flora's latest SHOW QUILTS, click on the following link:
www.storytellingworld.com/13974/
Note: The above link shows Flora's latest award-winning quilts, along with close-ups and many details.
Email her if you have questions about any of them.
The sections below are divided into the following categories:
Words of Wisdom Wall Quilts
Special Projects
PHOTO Projects
String Art Projects
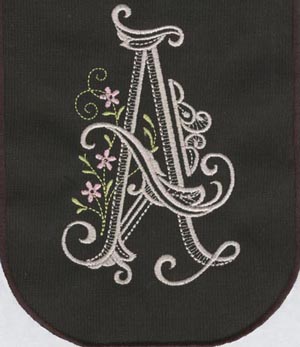
Monogrammed Items
Sweatshirts and Bags
Party Purses
Other Purses/Bags
Bed Quilts
Wall Quilts
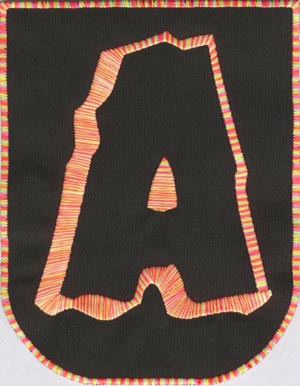
Original Chenille Letters/Projects
Placemats and Coasters
Many Other Projects
(Scroll down until you reach the section of interest to you.)
Note that all of the complimentary embroidery designs are provided ONLY in the .ART format, and we cannot translate them into other formats. (This is one reason they are free.) Thank you for understanding. You are free to use the complimentary designs/ideas below for your own private use. [This is Flora's chosen way to GIVE BACK to the "sewing community"--and especially to her fabric artist friends who have been so kind and generous to others throughout the years.] The information or designs for ANY of the projects, however, may not be sold, duplicated, distributed, reprinted, re-designed, for profit (either commercial or personal). HAVE FUN!
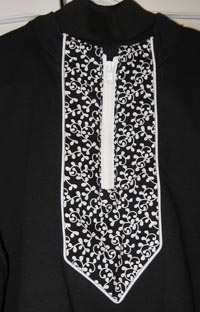
"Words of Wisdom" Wall Quilts
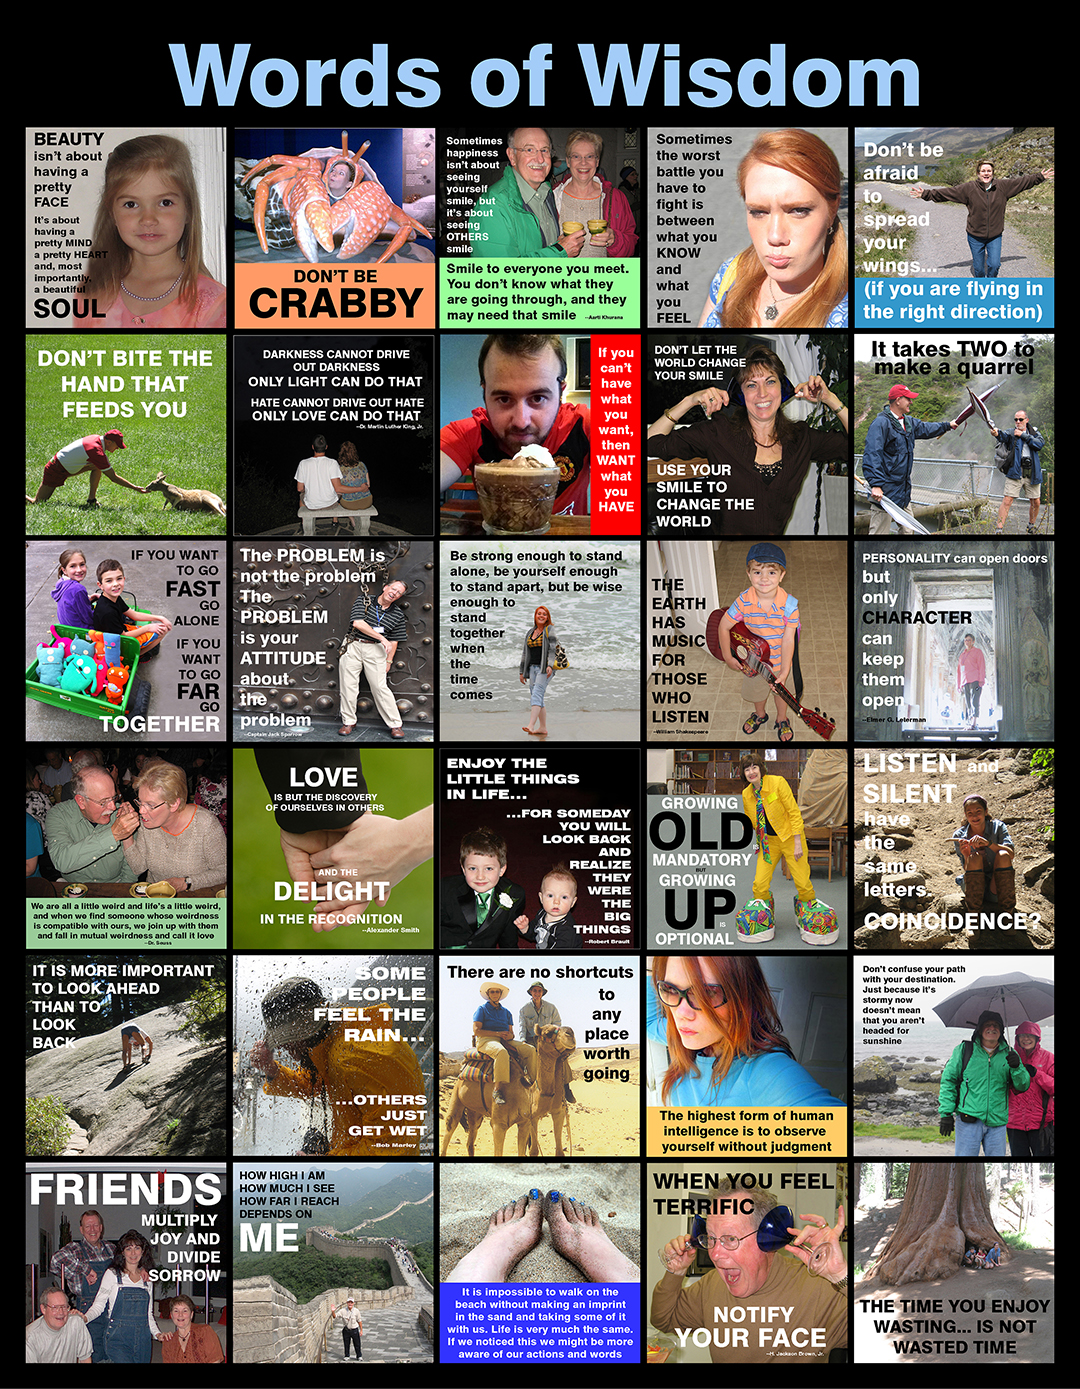
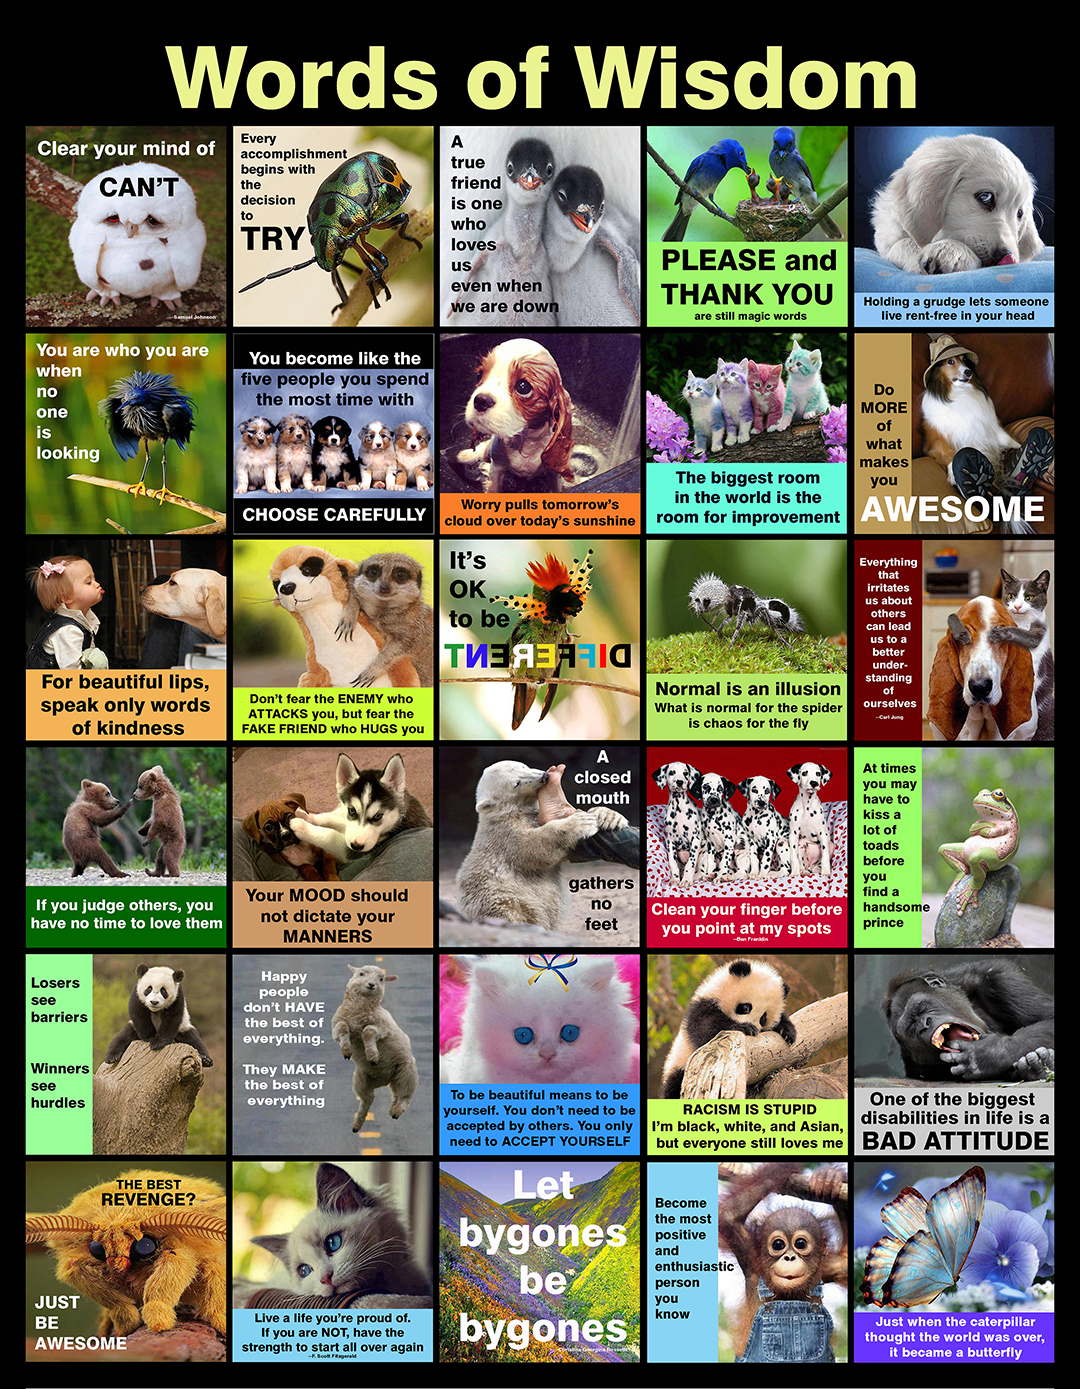
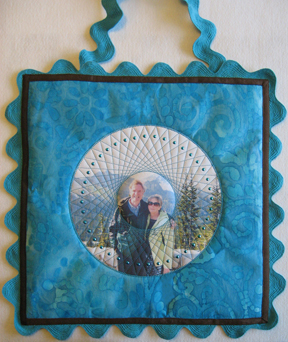
Up through June of 2013, Flora's friends and family members contributed photos and "sayings" that all went into a large POOL of potential content for a "Words of Wisdom" project that she has been working on for years (culminating in a Title 1 Conference presentation in December, 2013). This resulted in 1,250 mini-posters that have been shared via DVDs and online, and from those, two different WALL QUILTS were made. They are circulating in the area school systems (and in our families' homes) for the purpose of enticing conversations with youngsters (and "oldsters") about what is important in life. Email Flora if you have any questions about WHO are WHERE these photos were taken. Be sure to click on the link to see the details via a larger image:
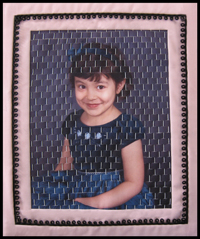
The quilt shown at the right is a TINY image of a CUDDLE QUILT made from selected photos that were used in a poster project earlier this year (for curriculum development in the schools). A CUDDLE QUILT is one that you can wrap around yourself while you are watching TV (or CUDDLING with someone you like). It may also be put at the foot of your bed... or hung on the wall. The ulterior motive is that the "cuddlers" will read the timely SAYINGS that are printed with the photos (and perhaps LEARN from them). |
 |
|---|---|
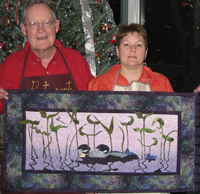
At the right is another but very DIFFERENT cuddle quilt, with the primary difference being that ANIMALS are the focal point (with only one exception). Sometimes young learners respond better to animals than to people as characters in posters, fables, etc. The goal is the same: That "viewers" will ultimately pay attention to the timely sayings in the 30 illustrations. Click HERE for a larger image of this quilt. |
 |
SPECIAL Projects
| From POSTER to WALL ART QUILT | |||
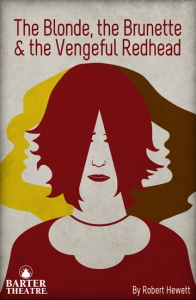
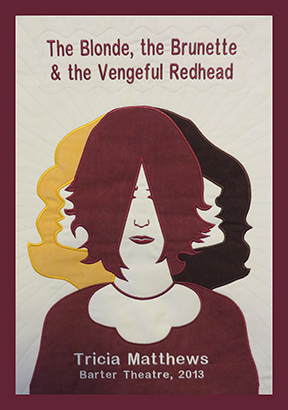
| Henry and I have thoroughly loved watching plays at BARTER THEATRE (in Abingdon, Virginia) since the first time we attended. As the years have passed, we have grown to know and love the Barter staff and actors. In June of 2013, we stepped inside the door of Stage 2 at Barter, and leaping off the wall and screaming at me was the paper poster shown on the left below. It was shouting, "Transform me into a wall art quilt and give me to Tricia...." That poster didn't shut up until I bought it and took it home with me. Then it screamed even LOUDER, and I finally made the wall quilt. [Click HERE for a larger view of this quilt.] We LOVE TRICIA MATTHEWS, and it was great fun to give it to her during the Appalachian Festival of Plays and Playrights. She did an INCREDIBLY FABULOUS job in this one-woman show at Barter. Those of you who were able to attend one of her performances already know that! A note to ALL other Barter performers: We love you also!!! If you didn't get a poster, that doesn't mean we don't think you are great! | |||
Special note to quilters: The fabrics used in this quilt were the very special CHERRYWOOD dyed products. I discovered them (again) at the Quilt Show in Paducah, and I LOVE them. If I ever win the lottery, I plan to spend EVERY DIME on these wonderful fabrics! Note 2 to quilters: Each of the sections of this design was drawn onto the corresponding fabric pieces and appliqued with a wide satin stitch onto the background fabric. Words were formatted in a computer file and transferred to the embroidery machine. Special note regarding permission: As all quilters know, one cannot "borrow" from the intellectual properties of others (without permission). Barter currently makes posters of all the seasonal plays, and permission was obtained to turn this poster into a wall quilt for Tricia. |
  |
||
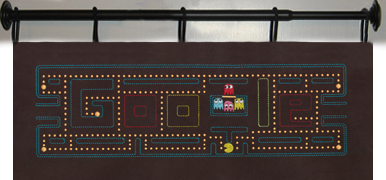
Do you know just how many Google images there are? BAZILLIONS, that's how many. You gotta see this one "up close." To do so, click HERE for a four-inch larger image, and if your computer can upload rather quickly, click HERE for a much larger detailed image. This was designed primarily with triple stitches and with candle-wicking stitches. What FUN! It was made for our nephew, Jason Roberts, a current Google VIP! |
 |
||
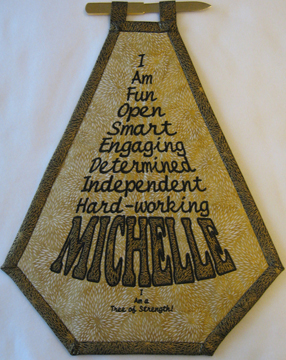
This 14"x18" wall quilt can fit into a TINY wall space. This is an example of a "Positive Quilt" that begins by asking the recipient to list several positive descriptors for him/herself. These words may then be selected and arranged by size (for ANY desired geometric design). This was made especially for our neice, Michelle Roberts. Click HERE for a larger image, and HERE for a closer look at the applique/embroidery. Each of these projects would need to be individually designed for the specific recipient. |
 |
||
PHOTO Projects |
|||
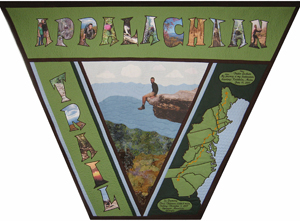 |
The Appalachian Trail Wall Quilt Click HERE for a larger image of this 78" wall quilt, made for Flora's nephew (Dustin Jackson) who walked the entire trail from June through December of 2007. The photos were ones actually taken by Dustin, and they were printed onto photo-fabric paper and then appliqued onto the quilt. The CENTER photo was made by Dustin after he positioned his camera and then dashed out to the edge of the cliff before the camera automatically clicked! (Click HERE to see that actual photo.) Yikes! The state shapes in the right panel were individually digitized and then appliqued onto the quilt. Click HERE to see a close-up of some states, and HERE to see the top "shoe," and HERE for the bottom shoe. So far, this has been Flora's GREATEST CHALLENGE regarding desigining / digitizing / embroidering, but it was GREAT FUN! [There are no printed instructions for the appliqued states for this wall hanging, but Flora's complimentary digitized states and letters are available HERE (all are ART5 files) and letter/applique instructions HERE.] |
||
 |
Last Supper Wall Quilt When Flora was growing up, her family had a painting of The Last Supper in a prominent place. This meant so much to her, and she always wanted to have a FABRIC representation of this famous painting. At long last she made one (after dozens of hours working with graph paper, using Photoshop, etc.). Click HERE for a larger version, and HERE for a closer view of the center section. | ||
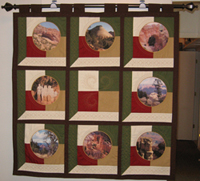 |
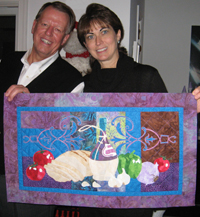
The CANYON quilt This quilt has eight photos from a Joy family trip taken in 2009. The photos were taken by Robin Cox, and the quilt was made for Henry's brother BILL JOY. This was both FUN and CHALLENGING. It was the first time I tried to do some of the machine stitching as the surrounding quilting. It was my SECOND "Attic Window" design, and I'm gradually learning. Click HERE for a larger view of the entire quilt. Click HERE and HERE for views of individual "windows" of the design. The MIDDLE block has some fancy quilting that doesn't show up in this photo. (Sorry about my bad photography, folks!) |
||
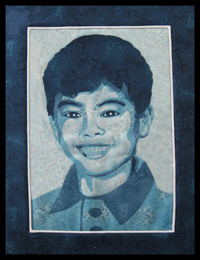 |
Posterized Photo The boy pictured at the left is Flora's great nephew, Peter Crowe. Click HERE for a larger view. This is Flora's first attempt at posterizing a photo--a process done in Adobe Photoshop (or similar program) in which the shades of the photograph are leveled, then cut from fabric families to represent the shading. Several resources explain this process, and a book (Portraits for Fabric Lovers: Mastering the Technique of Realism, by Marilyn Belford) gives a detailed explanation for how this can be accomplished. Another source is Maria Elkins. |
||
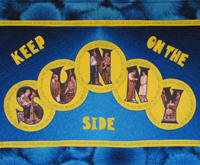 |
Sunny Side " Wall Quilt Click HERE for a larger version of this wall quilt, and click HERE for a detailed section. This quilt was made in honor of Eugene Wolf who played A. P. Carter in Barter's popular play, Keep on the Sunny Side. Click HERE for instructions on making these 3-D circles, click HERE for information about how to applique photos inside letter shapes, and click HERE for the digitized letters S, U, N, and Y (in ART5 files). |
||
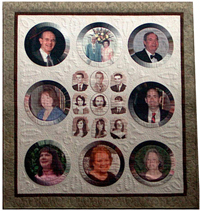 |
"JOY Family" Wall Quilt
|
||
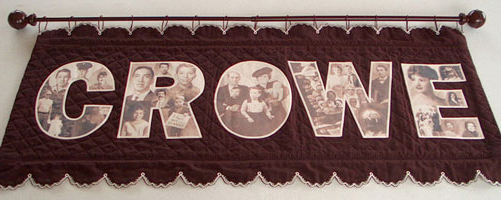
"CROWE Family" Wall Quilt |
|||
 |
|||
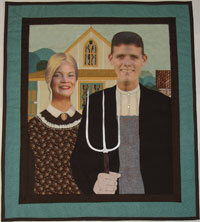 |
"Modern" American Gothic Wall Quilt Click HERE to see a larger picture of this "modern" American Gothic wall quilt. The couple in the "modern" quilt are Flora and Henry's niece (Ryann Gibson Aken) and her husband (K.C.). Flora designed this pattern by scanning an image of the original painting, then she prepared pattern pieces for each of the painting's separate fabric pieces. The instructions include an easy method for using fusible web for this wall quilt. If you are interested in receiving a pattern kit for making this wall quilt, make a request through Flora at: florajoy@comcast.net. The pattern kit is free. You will need to pay only shipping/handling. Click HERE to see another wall quilt made from the same design (for a different niece/nephew, Wendy and Brian Crowe). |
||
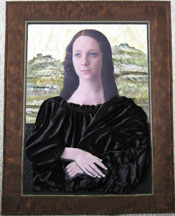 |
"Modern" Mona Lisa Wall Quilt Click here to see a larger image of this "modern" Mona Lisa wall quilt. (Niece Brooke Burleson is the "modern" Lisa.) Click here for Flora's instructions to prepare this wall quilt. Click here to see an image of the “original” Mona Lisa. Click here for fabric FACE to alter (in a program like PhotoShop). Click here for SLEEVE guides. Click here for fabric HANDS to print. |
||
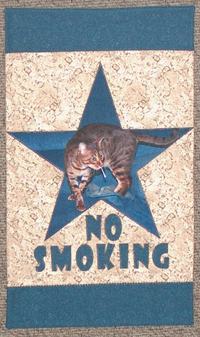 |
"NO SMOKING" Cat Wall Quilt Click HERE for a larger view of the image at the left. This was made from two Jinny Byer fat quarters and an image printed onto photo fabric. The cat belongs to sister/brother-in-law (Terry and Robin Cox) whose cat, Tigg, loves to play with Q-Tips. They shot this photo of Tigg while on the sofa playing with the Q-Tips. Click HERE to see Tigg actually viewing the wall quilt after it was hung. |
||
 |
"UN-Square" Wall Hanging |
||
 |
"Basket Photo" Featured at the 2009 National Quilt Show were many fabulous and eye-catching fabric projects. One was a concept called "Custom 3-D Pin-Woven Portraits" (as featured and described in the book An Updated Supplement to Sulky's Secrets to Successful Stabilizing, by Joyce Drexler, pages 18-22). The photo at the left follows that concept (with some modifications). So many folks have commented that it resembles a "basket," that we now refer to it as the Basket Photo. The girl shown in the picture is Flora's great niece (Mercy Crowe). Her image was printed onto printable fabric and then "transformed" with the weaving of the cut strips. Click HERE for a larger view. | ||
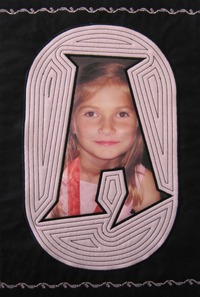
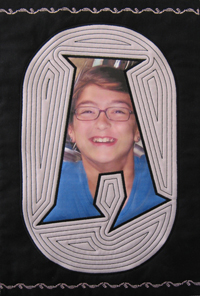
| Click HERE for a larger image of Abby, HERE for Sam, and HERE for Audrey. | Creative Letter Photo Shapes After completing the photo letters in the Appalachian Trail and Keep On the Sunny Side (both above), the next challenge was to do some "echo quilting" around the letter shapes. Below are a great nephew and two great nieces (Abby, Sam, and Audrey Crowe) in individual wall hangings. | ||
 |
 |
 |
|
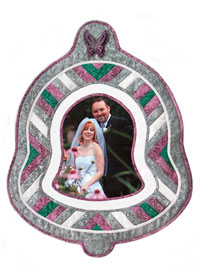 |
Wedding Wall Quilt Click HERE for a larger image of the design at the left. This was a wedding present for Flora's niece (Kendra Crowe McPherson) in 2004. The design begins with a photo (printed onto photo fabric) and appliqued onto a larger design. These borders continue as desired. Click HERE for complete instructions for how to make this wall quilt for one of YOUR special family members. |
||
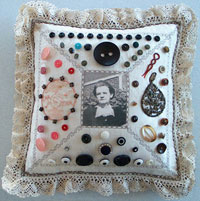 |
"Button Memory Pillow" Click HERE for a larger image of the pillow shown at the left. YOU can also make a pillow that keeps alive the memory of a beloved relative! Simply scan an image for the center, and print it onto photo fabric. Surround the photo with decorative stitching and "memories" of the relative. The buttons shown on this pillow were actually those left from Henry's great aunt, Lena Bolton, who was born in the 1880s. |
||
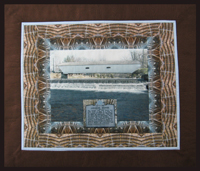 |
Covered Bridge Wall Quilt |
||
| STRING ART Projects | |||
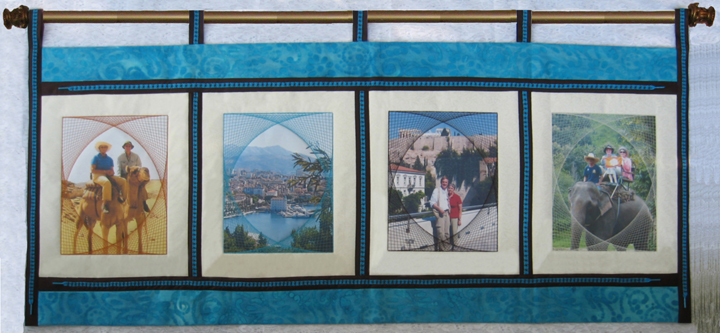
Remember STRING ART (from the '70s and earlier)? We nailed a bazillion nails at the edges of a square board, then we strung yarn around for interesting shapes. Flora has always been fascinated by that process (and still is)! This project is her technique of combining her computer and embroidery machine features, and IT WORKED! It begins with drawn lines on the computer, duplicating and rotating the lines, and continuing with this process ad infinitum--winding up with about 80,000 stitches when this was transferred to the sewing machine. This project uses four photos (of very special friends) and adds a stitched string art design around each photo. These four pieces were then sashed and decorated with "embellished shoestrings." |
 |
||
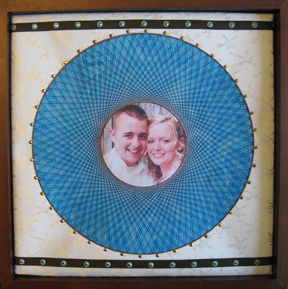
The string art samples at the right show an entirely different concept with the computer and sewing maching combination. They demonstrate two different methods of showing FACE(S) in string-art pieces. The first uses a stitched border of solid fabric, and the second centers the two heads in the photo but has the stitches appearing atop the edges of the actual photo. The first sample has about 25,000 stitches, with alternating colors of thread. It a wedding photo of Flora's Goddaughter and her husband (Meg and Grant Foster). Click HERE for a larger image of this project. The second is another photo of Jane and Ray on one of their vacations. Click HERE for a larger image of that project. |
  |
||
| This was a JOKE GIFT--a photograph that had string art stitched on an outer border, then a two-inch clipped fringe as an outside edge. This has a pocket on the back into which jingle bells can be placed so the entire piece can be used as a cat's toy. The frayed edges tickle the whiskers of the cats as they bounce it all over the place. Click HERE for a larger image. | 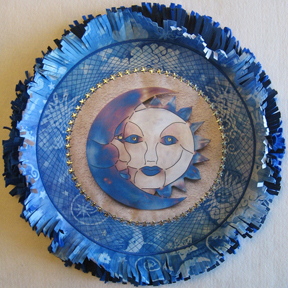 |
||
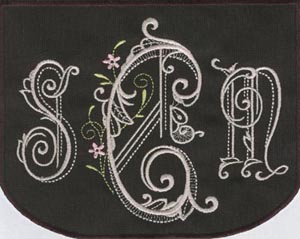
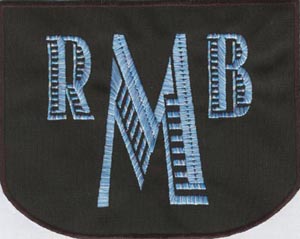
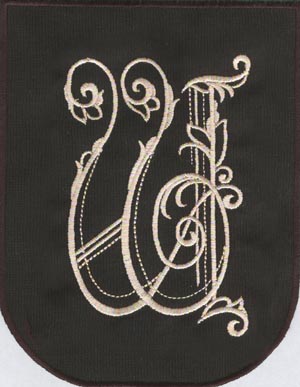
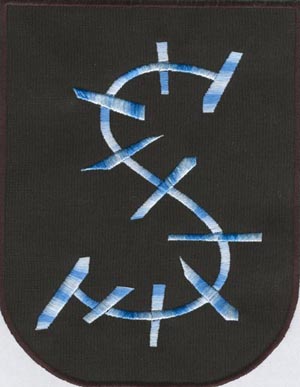
| Monogrammed Items | |||
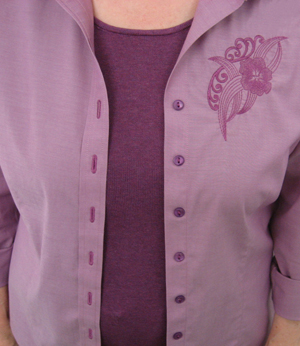
| Monogramming can add spark and individuality to already-purchased garments. The shirt at the right has a hand-painted design on its left side, but (when purchased) it was completely blank on the left. The selected font matched the branches and stems of the design, thus accentuating the design and "marrying" the two sides. The selected font was from the "True Type" styles (which will all immediately transfer into monogams to be stitched in the Artista Software programs). | 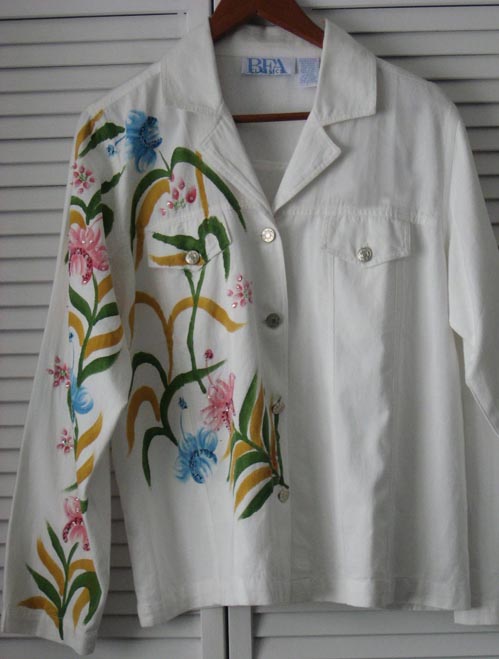 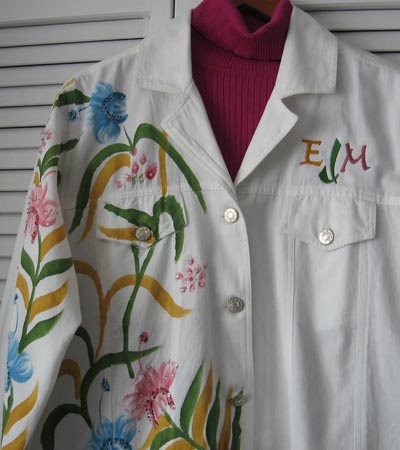 |
||
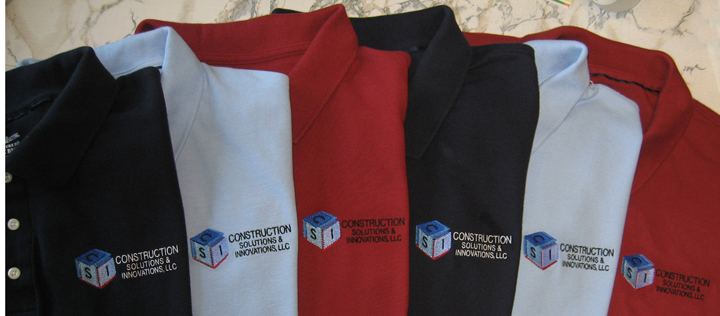
The shirts at the right show a design prepared specifically for a company called Construction Solutions & Innovations, LLC. The same design (with added words) was stitched on each shirt, with white thread used for the darker shirt fabrics. |
 |
||
 |
  |
||
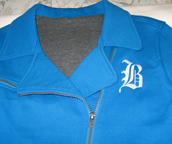
Above is an example of stitching the letter "B" (for our niece Brooke Burleson) onto a purchased jacket. |
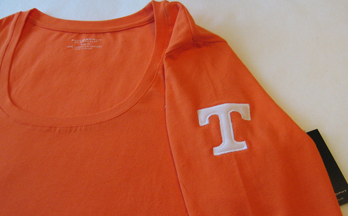
Our niece (Ryann Aken) is NUTS about UT! These items were made especially for her. The long-sleeved Tee has the monogrammed "T" on the left sleeve, and the two hand towels have both the monogrammed letters (plus some purchased UT ribbon). These were FUN to make! |
||
The three samples in the adjacent left column are from the STERLING MONOGRAM set offered by OESD. (We LOVE these letters!!!!) The three samples in the far right column are all from True Type fonts. (To determine the SPECIFIC font of any of the samples, e-mail Flora.) All of these samples (and numerous others that were similar) were stitched onto black canvas. A very close satin stitch was stitched on ALL of the edges (in a "pocket" shape), and each design was trimmed close to the outer edge. These pockets were then sewn onto blank black canvas tote bags (commercial or purchased) and given as gifts to family members.
DO explore the True Type fonts available in your computer for some FUN experiences with monogramming (AND explore the commercial packets like STERLING MONOGRAMS). These gifts can be absolutely delightful! |
|
||
| Sweatshirts and Bags | |||
 |
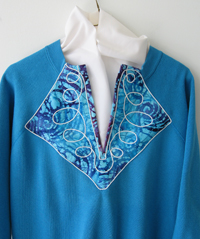
Flora's One-Hour Sweatshirt Makeover Sweatshirts are COMFORTABLE! Therefore, they can make nice gifts (for yourself, also). Click HERE to see a larger image of the made-over sweatshirt at the left. Click HERE for complimentary information about how this sweatshirt was made and how additional ones can be prepared. [It may take a few minutes for this file to download.] Feel free to modify according to how YOU would like yours to look. |
||
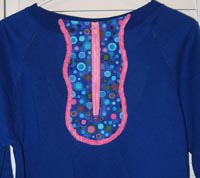 |
The photo at the left is an additional example of the one-hour sweatshirt makeover, and the same instructions may be used with only a couple of exceptions. This one is different because the RAW EDGE top decorative fabric was zigzag-stitched at the edges, and these wavy edges were then topped with pink chenille strips. The zipper opening allows more neck space. Click HERE to see a larger view of this modified sweatshirt. This is just one example of how you can create your own different appearances with in this concept. | ||
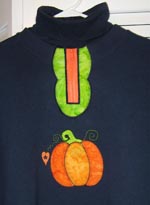 |
The photo at the left is still another example of how the one-hour sweatshirt makeover can be modified. Click HERE for a larger view. This actually happened as an "accident." a few years ago I embroidered the pumpkin onto the navy sweatshirt. However (as you can see), the pumpkin was too LOW on the sweatshirt for my taste. Therefore, I just put it aside and didn't wear it. After I got into these makeovers, I pulled this out of storage and thought about what to do so I could wear it. A small inset and a bright zipper did the trick! This shows that we are limited only by our own imaginations! Note that I have a navy turtleneck inside the sweatshirt (because that's how I actually wear it). | ||
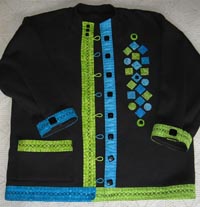
| A plain UGLY sweatshirt (first photo) can be transformed with just a smidgeon of embroidery. Plus, having a blouse the same color as the embroidery thread can certainly help with the final "look." This shirt feels GOOD! Practically any plain sweatshirt can be transformed accordingly! Most of these can be done in less than an hour. | 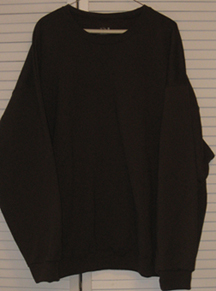 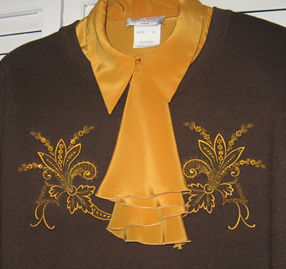 |
||
 |
The sweatshirt at the right is a result of Flora's MOM (who LOVED to wear sweatshirts, and who couldn't tolerate the typical tightness at the TOP) who took a pair of scissors and CUT a slit down the front of a sweatshirt WHILE she was wearing it!! Flora had a real challenge with this one because of the ANGLE at which her mom had cut the shirt. The wider and more angular front cotton fabric was necessary to cover the entire zagged slice. It is now one of her mom's favorite sweatshirts (because "there's ROOM to put my head in," says her mom). Click HERE for a larger view. | ||
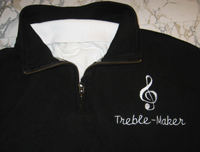 |
Treble-Maker Collared Sweatshirt Flora blames her brother CAREY for this one! He called her a "Treble-Maker" when they were TRYING to sing, and she told him he had caused some "grief"! This shirt is a quarter-zippered and collared sweatshirt, and you can wear it with or without a dickie or other sweater beneath it. A white dickie was inserted inside before the photograph was made. Click HERE for a larger view. |
||
 |
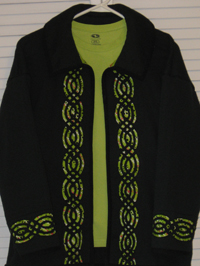
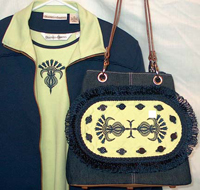
Matching Sweatshirts and Purses The sweatshirt at the right was a FUN experiment for Flora. Click HERE to see a larger image. Click HERE for complimentary information about how to make this sweatshirt and its matching purse shown in the photo below the sweatshirt. |
||
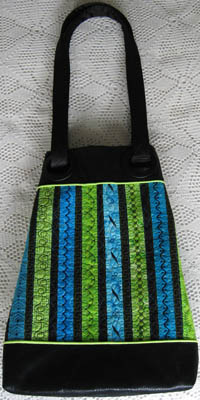 |
Click HERE for a larger image of the purse. | ||
 |
Another Matching Sweatshirt and Purse OK, this could go on for awhile. After Flora made the above combination, she decided she wanted a BLACK AND WHITE purse and sweatshirt. Click HERE to see a larger image of the sweatshirt. Note that a solid black turtleneck was placed behind the sweatshirt so the fabric insert and zipper could be seen better. |
||
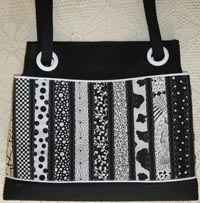 |
Click HERE for a larger image of the purse. Click HERE for complimentary instructions for how to make the purse. [It may take a few minutes for this file to download.] | ||
 |
Flora's Version of the "Cable Sweatshirt" A quote from Flora: "I saw so many of the wonderful ladies in our quilt guild wearing the beautiful sweatshirts they had made by stitching on the cable design then cutting out the 'innards,' and I WANTED ONE. I searched everywhere for the pattern (in area stores, online, etc.), and it was nowhere to be found. 'How hard could it be?' I said to myself, so I set out to make my pattern. YIKES! It was TOUGH to do. I don't know how close I got, but I learned that the next time I say to myself, 'How hard could it be?' then I'll continue to search until I find the pattern. I DO like how CUTTING OUT bits of the fleece of the sweatshirt can make an interesting illusion. Maybe I'll try some other designs later (if I can find a PATTERN)." Click HERE for a larger version of this sweatshirt. [These photos are shown with a lime t-shirt beneath the sweatshirt.] | ||
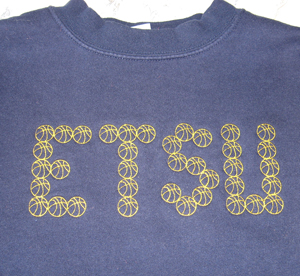
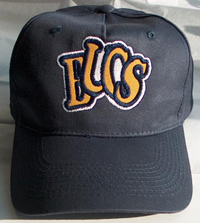
| ETSU Basketball Sweatshirt Why not create your own sports sweatshirt instead of paying big bucks for those sold in the arena? This was made by first digitizting ONE tiny basketball -- then duplicating them and putting them in rows of letters representing the specified university. These are fun to make, and they are definitely UNIQUE! Make several for gifts for your family and friends! |
 |
||
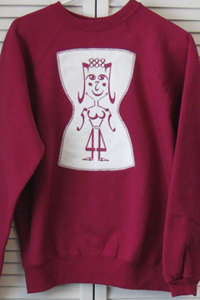 |
Sweatshirt for MATH TEACHERS (accountants, clerks, etc.) Look closely at the image at the left (or click HERE for a larger image). The "lady" is merely NUMERALS. Flora says, "I have always wanted to create an image that appears to be a person, and this is a result after many hours of attempts. I don't like it yet, but it will 'do' for now." This software design is complimentary for those who can have Artista Version 5 or higher. Click HERE for this design. (Let us know if you create one better.) Click HERE for a more detailed view of the numerals. Have FUN with this one. BTW: The shape around the lady is supposed to be an hourglass. This one was stitched onto the WHITE FLEECE independently (in case it messed up) and blanket-stitched onto the colored sweatshirt. It can be removed, if desired. Also, sayings may be added--such as "You do the math," etc. |
||
 |
PURSE OVERLAY (For the Large Oval Hoop) Click HERE to see a larger version of the image at the left. This is a way to take a PLAIN purse and button on overlays to match your outfit. Click HERE for instructions to prepare this purse overlay. Click HERE for the complimentary embroidery design (in versions 4 and 5) for the Bernina software. |
||
"Before and After": |
Embellished Shirts/Tote Bags | ||
The "Before" shirt |
The "After" shirt |
||
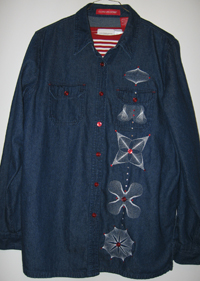
| Alter your "plain" garments with embroidery. Click HERE to see a larger view of the (above) UNEMBELLISHED and unattractive (in my opinion) shirt. | Click HERE for a larger view of the same shirt (above) after embroidery stitching and some embellishment. Click HERE for a more detailed view. Click HERE to see a larger view of the matching TOTE BAG adorned with POCKETS from the embroidered samples. Click HERE to see the BACK of the same tote. Click HERE for instructions for making easy pockets. | ||
| Below is another example of a BEFORE and AFTER. I love the Coldwater Creek clothes and wanted a no-iron shirt for travel. However the "before" photo (on the left) was what the shirt looked like when I bought it, and the photo on the right shows a big difference (to me) after changing the buttons/buttonholes and adding an embroidered design. QUICK AND EASY! | |||
 |
 |
||
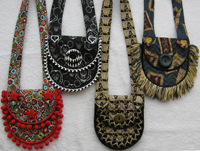
| Party Purses | |||
Flora's ORIGINAL DESIGNS: More COMPLIMENTARY Gifts for YOU! You will need an embroidery machine. Complimentary designs are provided for Artista software (.ART files), versions 4.0 and 5.0. |
Information about Flora's ORIGINAL Complimentary "Make-It-in-the-HOOP" Embroidery Party Purses: The first item below is one of Flora's In-The-Hoop project. The items that follow are different versions of Flora's original PARTY PURSES. These purses can hold "the basics" and can look dashing at parties (or can be worn for convenience at casual events). Let your EMBROIDERY MACHINE do the work for you, and achieve AMAZING results with practically NO additional regular sewing (1-5 minutes). Use formal fabrics OR select cute, novelty prints for these projects. These are followed by other purse/tote ideas. All of these can be made within MINUTES, and you can complete a STACK of gifts in one day. EnJOY! |
||
 |
PARTY PURSES (Two hoopings--in a Large Oval Hoop) Click HERE to see a larger image of this party purse, click HERE to see TWO different ones (with the same fabric), click HERE to see SIX different ones, and click HERE to see SIX additional ones. Click HERE for complete INSTRUCTIONS and EMBROIDERY DESIGNS for making the party purse shown at the left. |
||
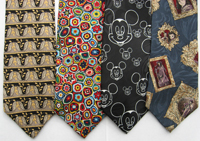 |
PARTY PURSES from MEN'S TIES (One tie = one purse) The four ties shown at the left were turned into four party purses (shown in the photo below the ties). This concept is very similar to the Party Purses in the above project--except that the remainder of the tie is turned into the strap. |
||
 |
Click HERE to see a larger version of the tie purses shown at the left. Click HERE for the complimentary printed instructions for making these ties. Click HERE for the complimentary digitized embroidery designs to make these ties. These files are in the .ART5 version to be used with a Bernina machine.
|
||
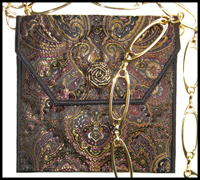 |
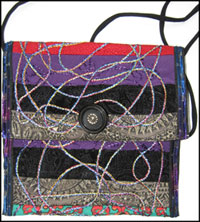
"No-thread-change, Only ONE-HOOPING, Finish-in-less-than-an-hour" PARTY PURSES (with MEGA hoop) Click HERE for a larger version of the sample purse shown at the left. For a small, elegant party purse that uses only ONE hooping (etc.), click HERE for a zipped file of complimentary instructions and designs for use with a Bernina MEGA HOOP--.ART files (versions 4.0 or 5.0). |
||
 |
"Sane Patch" (not Crazy Patch) Party Purse--WITHOUT Machine Embroidery Click HERE for a larger view of the purse shown at the left. This is for sewers who DON'T have an embroidery module (or who don't WANT to embroidery). This pattern is adapted from Clover's "Sew Sweet Satchel"--and it is designed to be EVEN EASIER than the already-easy instructions provided by Clover. Click HERE for Flora's modified instructions of this design. |
||
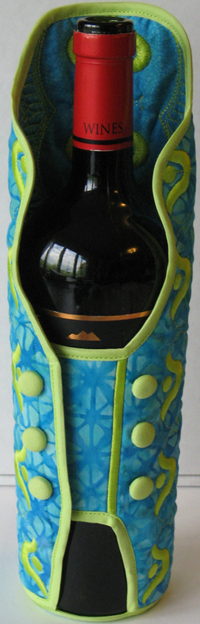
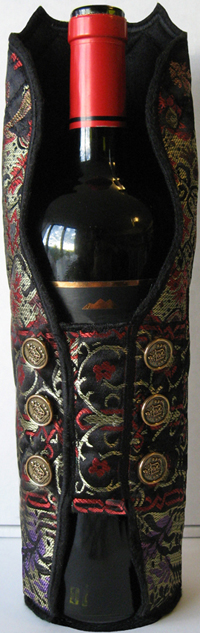
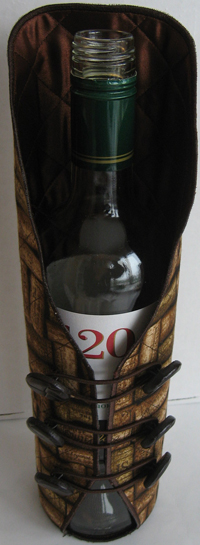
| Wine Bottle Covers | |||
| Below are three of Flora's original wine bottle covers. Click HERE, HERE, and HERE for larger views of these items. | |||
 |
  |
||
| Other Purses/Bags/Stitches | |||
| Hobby and Land Purse HANDLES A manufacturer (Hobby and Land) designed a very special PURSE HANDLE that is filled with charm and appeal. Flora has made bags using several of these handles, and two of the samples are shown at the right. THESE ARE GREAT FUN TO MAKE!! Click HERE and HERE for larger views. |
  |
||
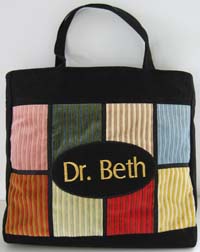 |
"Beggar Bag" In some countries, a "Beggar Bag" is a gift given to a medical student. This bag is made from fabric scraps that the seamstress had to "beg" from others--often squares that have been left over from garments or other home dec projects. The "beggar" concept stems from the fact that by the time medical students graduated, many were so poor from the educational costs that they had to BEG for the essentials. Click HERE to see a larger version of this bag--made (from scraps of corduory) for DR. BETH JACKSON, the daughter of Henry and Flora's very dear friends, Mickey and Vicki Jackson. (Is the above story true about the concept of "Beggar Bag," or did Flora just make up the whole thing? YOU decide! You'll have to admit, though, that the story SOUNDS logical. Hee! Hee!) | ||
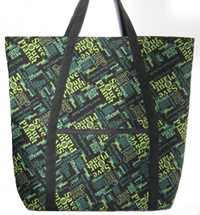 |
E-Z Shopping Bag Tote For those who are environmentally astute, the shopping bag tote can be a nice gift. Although there are numerous inexpensive bags that are sold at chain stores, one made especially from "Save the Planet" fabric can be a unique gift. Click HERE to see a larger image of this bag. Click HERE for complimentary instructions to make this bag. EnJOY! |
||
 |
CAT PURSES (Three hoopings--in a Large Oval Hoop) |
||
| SO GIRLY Totes The photos on the right show the BACK and the FRONT of a tote made from the designs in the SO GIRLY embroidery collection by OESD. Click HERE for a larger view of the front and HERE for a larger view of the back. The front pockets are used for cell phones, ipods, sunglasses, etc. |  |
 |
|
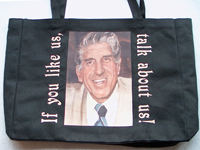 |
Creative Book Tote (with Book Jacket and Book Title) Click HERE for a larger view. A recent book was written about the life of the founder of Barter Theatre in Abingdon, Virginia, entitled If You Like Us, Talk About Us. This is a tote bag with a fabric scan of Robert Porterfield and stitched book title. Click HERE to see the actual book cover. |
||
 |
Sample Purse from a Placemat Click HERE for a larger view. Only recently the rage was making purses from placemats. Well, that can STILL happen. Just continue looking for gorgeous placemats, and open your creative brain. The SKY is the limit regarding how wonderful these CAN be. (Be careful to prepare the HANDLE so it is firmly attached! It can be embarrassing to later learn that the handle "broke" because it wasn't stitched securely enough!) |
||
Decorative Stitches on Bernina Machines (for CIRCULAR projects) Those wishing to experiment with the decorative stitches on most Bernina machines, click HERE, HERE, and HERE to see samples of several of these stitches in a CIRCULAR fashion. These stitches are identified by number, and spending a few minutes with these samples might help you decide which ones YOU want to explore. |
|||
| Bed Quilts | |||
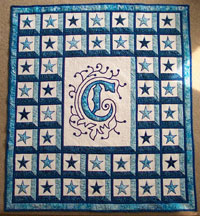 |
Flora's Full Bed Quilt for her MOM Click HERE to see a larger view. For her mom's 90th birthday Flora made a special quilt. The initial "C" stands for her mom's last name (Irene CROWE). Each "star" stands for a MILLION stars that will be in her WONDERFUL mom's crown when she reaches the Pearly Gates!! Click HERE to see just the letter "C" and the surrounding stippling. Click HERE to see Flora's mom receiving this quilt on her 90th birthday. This quilt design is called "Attic Window," and it is EASY to do. The Internet offers various instructions, and you can put anything in the "window" that you want. All of these stars are machine appliqued (as was the letter C and its surroundings). |
||
| Wall Quilts | |||
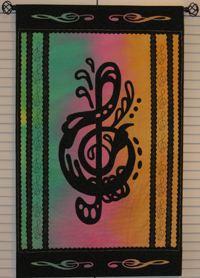 |
TREBLE Wall Quilt The design shown in the photo at the left was adapted from a commercially available pattern. Flora took the treble design, modified it, then put border strips of fusible web and topped them with decorative stitching to hold them in place. Then she made triple-stitched trebles in the Artista software and embroidered them between the narrow borders. She designed the flat trebles in Corel, then transferred them to fusible-web-backed matching fabric. This lovely fabric was hand-dyed by KAREN DIETZ, a California fabric specialist (among other things). Click HERE for a larger view of this wall quilt. |
||
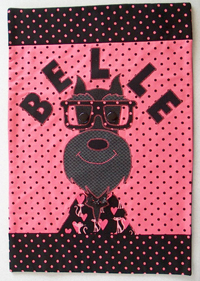 |
"Belle" (Dog) Wall Quilt--from an episode of Simply Quilts Click HERE for a larger view of the image at the left. This design was modified from the one provided on Simply Quilts, Episode 934, entitled "Dog Days of Quilting." Note: This complimentary design and instructions are STILL available online. Google "Simply Quilts"+"Dog Days" to find the site, then link to "Dog Days of Quilting" to find the information and pattern to print for your files. Flora modified this pattern in many ways--one of which was to add the dog's NAME at the top with appliqued letters--using fusible web and the blanket stitch to hold them--AND the dog pieces--in place. It was GREAT FUN! |
||
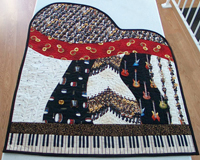 |
GRAND PIANO Wall Quilt--from a past issue of Fabric Trends Click HERE for a larger view of the image at the left. This design was shown in the Fall 2004 issue of Fabric Trends, pp. 62-63. The kit and pattern were no longer available, so Flora sketched out something similar to what was shown and made the quilt from there. |
||
|
Wall Quilts from McKenna Ryann's patterns Click HERE to see a larger view of the TOP design, and HERE for the BOTTOM design. Both are from the famous designer, McKenna Ryann (who has a multitude of beautiful quilt patterns available for purchase, and they all are described on her Web site). The top design is entitled "All-a-Loon in the Mist" (held by good friends Jim and Brenda Wilson) and the bottom is "Bruschetta & Vino Rosso" (held by wonderful friends Harold and Nancy Dishner). Gifts such as these are not only great fun to make, but they are also quite challenging because of the very small individual pieces. The collage of pieces use double-sided fusible web to adhere to the quilt. |
||
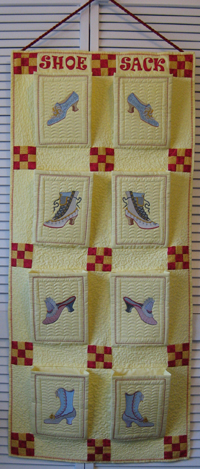 |
SHOE SACK (made from quilted embroidery squares) Click HERE to see a larger view of the shoe sack shown at the right. This was Flora's response to the 2007 challenge of the Blue Ridge Quilt Guild. (The two criteria were: to have at least ONE nine-patch in the quilt, and to have some yellow.) The embroidered "shoes" are from the purchased design pack, "Endearing Embroidery Designs," by Sue Box. Four different shoe designs were pulled into the computer, and a duplicate MIRROR image was made of each (thus, four different "pairs" of shoes). A rectangle was drawn around each shoe (as large as would stitch in the oval hoop), and the background quilting effect was programmed in. [This was the FILL STITCH "Heirloom 719" in the Bernina Embroidery Software, and the row spacing was reset to .40.] CAP STIFFENER was used to thicken each of the pockets. The yellow binding was then blanket stitched at the edges. [Forgive the poor quality of the photo--the sack "curved" and puckered the designs. Sorry!] The purpose of posting this Shoe Sack on this Web site is to encourage all of YOU to take several of your sample embroidered squares and put them into a usable project. The first few of these squares were actually just "samples" and experimentation with the newly-purchased designs. |
||
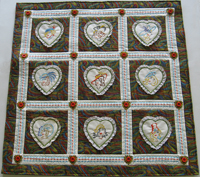 |
GLAMOR GLITZ Wall Quilt (designs from OESD's embroidery pack) Click HERE to see a larger view. (Sorry about the poor photography!!) Click HERE and HERE to see two separate, up-close sections of this quilt. This began with one LARGE piece of fabric. Eight long beige strips were cut, stitched (with pre-determined stitch recipes), then attached to the TOP of the big fabric piece. THEN the embroidery designs were stitched with added heart shapes and lace edges. The TOPS of these trimmed designs were left open for pockets, and the bottoms were sewn firmly to the insides of the nine squares. Buttons inside smaller hearts completed the embellishment. Click HERE for a ZIP file for .ART files for the HEART OUTLINE, the SMALLER HEARTS, and the STITCH RECIPE. |
||
Original |
CHENILLE Letters | ||
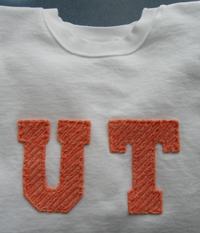 |
Flora's Chenille-Letter Sweatshirts Chenille letters can make FABULOUS gifts for your friends and family. Click HERE to see a larger view of the UT sweatshirt. Flora has designed a complete set of chenille letters for you to use with your projects. These letters are all made in the embroidery hoop (with .ART files). Click HERE for the instructions, and click HERE for the files for ALL 26 LETTERS in the "varsity" font. Have FUN with these! |
||
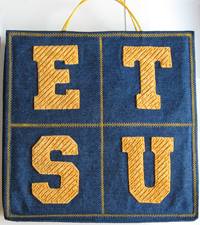 |
Flora's Stadium "Security" Seat Cushions Chenille letters can be used for a variety of other projects. The photo at the left (click HERE for a larger view) is actually a CUSHION for sports events. Click HERE for a section view of this cushion. When the TOP FLAP (the one with the letters E-T-S-U showing) is lifted, another "hidden" layer appears. That layer is shown in the photo immediately below (also at the left). For the actual chenille LETTERS for such projects, see the ABOVE section. Click HERE for the instructions to prepare a project similar to the one shown. |
||
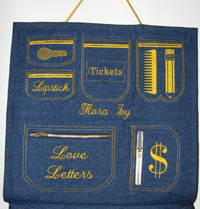 |
The photo at the left shows the cushion (above) when it is OPENED. Click HERE for a larger view of this hidden layer. Click HERE to see an "up-close" section of this hidden layer. Click HERE for the complimentary digitized embroidery design files shown in the photo. Feel free to be as creative as you wish with your own "pockets" for this hidden layer.
|
||
| Placemats and Coasters | |||
| Personalized Placemats | |||
| I had great fun experimenting with the word "JOY" in the 830 jumbo hoop. I began with the largest OVAL that the jumbo hoop would stitch, then I digitized rows of the word JOY in diagonal lines inside that oval. [I inserted digitized "monogram" letters to this "Joy base."] This inside design is one CONTINUOUS stitch line--no thread cutting or jump stitches. FINISHING: After removing the quilt sandwich from the hoop, I left a two-inch fabric outer border (beyond the digitized design) and then completed the placemats with bias binding on the edges. (I LOVE my 830!!!) Click HERE for a larger view. | 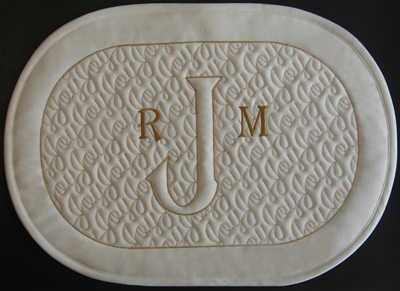 |
||
| Continuous Line Reversible Placemats | |||
| Continous line (no jump stitches) placemats are EASY to make with the 830 jumbo hoop. Shown at the left is ONE placemat (reversible sides). Click HERE and HERE for larger views of the placemats. Instructions for these and complimentary designs for both placemats and coasters are given HERE in a ZIP file. This is GREAT FUN! | 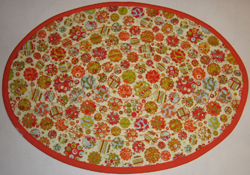  |
||
 |
Stippled LETTER COASTERS (in a Medium Hoop) Click HERE to see a photo of five of Flora's STIPPLED COASTER samples (including the one shown at the left). Click HERE to see a photo of Flora's UT and ETSU COASTERS. Click HERE to see a photo of Flora's MONOGRAMMED COASTER samples. Click HERE for complete INSTRUCTIONS and EMBROIDERY DESIGNS for several coaster letters, for the Bernina Embroidery Software, versions 3, 4, and 5. Click HERE to see a sample HOOP SAVER. | ||
| Other Projects | |||
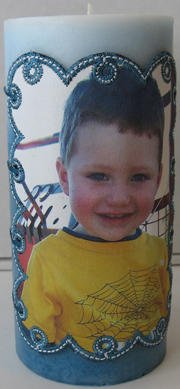
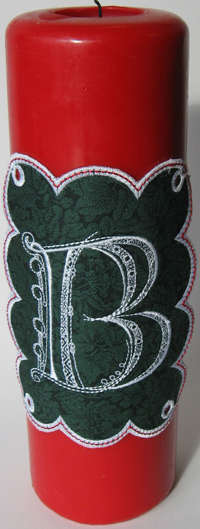
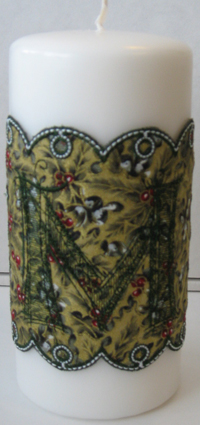
| Click HERE, HERE, and HERE for larger versions of those shown below. Note that a variety of different circular buttonholes may be used. | Candle Wraps These designs are original with Flora. She has had FUN this year experimenting with some easy-to-make candle wraps. These make nice gifts, especially after a photo or a monogram has been stitched on. |
||
 |
  |
||
| Flora's fun with Bernina's Cap Hoop! | |||
 |
|||
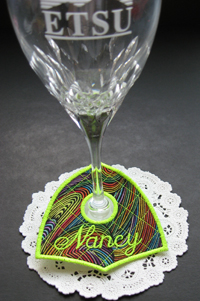 |
Novelty "ID Tags" - for Goblets, Napkin Rings, etc. Be the hit of YOUR OWN PARTY or give a fabulously unusual gift to a friend with these very unique fabric ID TAGS! When your guests arrive and are served a beverage in a stemmed glass, you can cleverly slide their own personal ID Tags onto the stems of their classes. Wherever they leave their glasses, they can easily identify them again. Click HERE for instructions on how to make these clever items. Click HERE for SIXTY-ONE complimentary, already-digitized embroidery designs to get you started! These designs are in a ZIP file and are for the Artista (Bernina) embroidery machines. Click HERE and HERE to see additional photos of how these fabric novelty ID Tags have been used. (Note: These ID Tags have a SLIT at the top so they easily slide onto the stem or folded napkin. These photos do not show that slit.) |
||
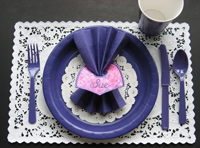 |
The photo on the left shows a place setting where the novelty ID tag is being used as a napkin ring. The SAME ID Tag may be used for EITHER the stemmed glassware or as a napkin ring. They may also be used for a variety of different projects. You are limited only to your own imagination!
|
||
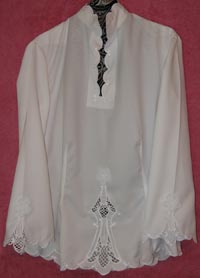 |
Flora's Version of Louisa Meyer's Blouse In her book FROM TASSELS TO TEXTURES, Louisa Meyer showcases a stunning blouse that is embellished with machine embroidery cutwork (pages 84-89). This is Flora's adaptation of that blouse. Click HERE to see a larger photo of the COLLAR in detail, and HERE to see the SLEEVE in detail, and HERE to see the front. Flora changed the COLLAR because she "likes to hide her neck." Although this blouse is labor-intensive, it is fun to make! | ||
The following section shows Flora's FABRIC FUN with "Cake Decorating" In one of Flora's "earlier lives," she enjoyed decorating cakes. Her love of FABRICS has taken her early passion of cake decorating into new territory. Enjoy the samples below! |
|||
 |
FAKE CAKE for FABRIC Artists Click HERE to see a larger image of the "fake cake" shown at the left. Click HERE for the brief (easy) instructions to make a similar "fake cake." |
||
 |
DIAPER CAKE for FABRIC Artists Click HERE to see a larger image of the cake at the left. This "cake" is made completely out of DIAPERS and other fabrics/decorations, and it was given as a gift to Flora's great niece, MERCY CROWE, on her birthday on December 10, 2004. This diaper cake is not one of Flora's original ideas--her inspiration came from the book, Treasures for Baby, by Ellie Joos (pages 14-16). You may modify Joos' design in any way that suits your own needs. |
||
+ + + + + + + + + + + + + + + + + + + + + + + + + + + + + + |
|||
Click HERE for Flora's Complimentary "Reverse" Mitering Tool Instructions. |
|||
+ + + + + + + + + + + + + + + + + + + + + + + + + + + + + + |
|||
| CONTINUED FUN and Creative Uses of Embroidery Digitizing and Designing Since the purchase of her last Bernina sewing machine (her first machine that actually embroidered), Flora has stitched well over a THOUSAND designs and has made HUNDREDS of presents to give to her friends and family. Below are a selected few. E-mail her if you have any questions about them. No images are shown in the LEFT column, but FULL images are available by clicking onto their links. |
|||
Click HERE to see GRADUATION STOLES for the ETSU Roan Scholars during the years that Dr. Nancy Dishner was one of ETSU's VIPs. Click HERE to see BANDANAS worn by the volunteers at the National Storytelling Festival (in the early 2000s). Click HERE to see HAND TOWELS with the full name of the recipient. (Claire is the WONDERFUL and FABULOUS president of Parents' Choice!) Click HERE to see BATH TOWELS with only the first initials of the bride and groom. Click HERE and HERE to see creative barbeque APRONS for two wonderful and dear friends! (See if YOU can figure out who they are!) Click HERE to see a T-SHIRT creative for a much-loved actor at Barter Theatre, FRANK GREEN. (Can you tell that the Joys LOVE Barter Theatre???) The "Barter Green," by the way, originally referred to a "green" area on the Barter campus. Frank's "face" was digitized using PHOTOSNAP. CREATIVE PILLOWS: Click HERE for a pillow that uses an image printed on photo fabric. Click HERE for a pillow made of interesting embroidery designs--and HERE for the SAME PILLOW in a different color. |
|||
| As you can see, folks, this could go ON AND ON AND ON.... Thank you for your time in viewing this Web page. If you have any questions or comments about these projects, feel free to e-mail Flora. | |||